Hi to all on ukcampsite.co.uk
I wanted a way to keep my leisure battery fully charged while my caravan is in storage but I have no access to mains electric where my van is stored. I did a bit of internet trawling and copied this idea from another like minded caravanner. I am posting this project in the hope that others will copy this idea and benefit from plentiful free energy to keep leisure batteries topped up wherever the caravan is stored outside - note solar charging is unlikely to work indoors!
So the solar charging project requires some equipment to be purchased. I bought a solar panel kit from a well known auction site E***. It included a solar panel, some cable, an inline fuse for safety and a charge controller. Its much safer to buy a kit with a charge controller as it stops your battery being over charged and protects against the battery discharging back through the solar panel in the dark when no energy is generated. It also provides some led indicators to show you what is going on with your battery and charger.
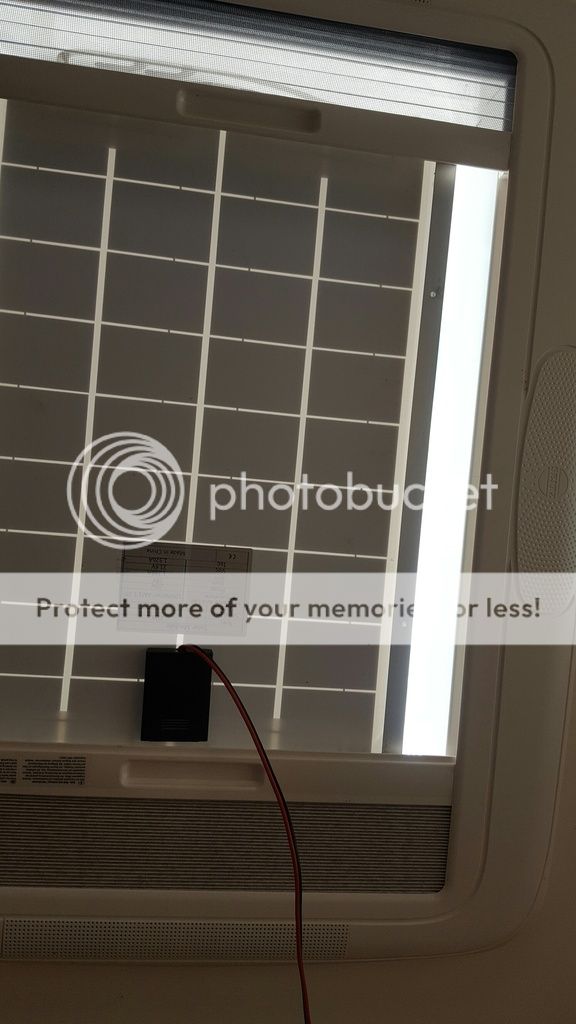
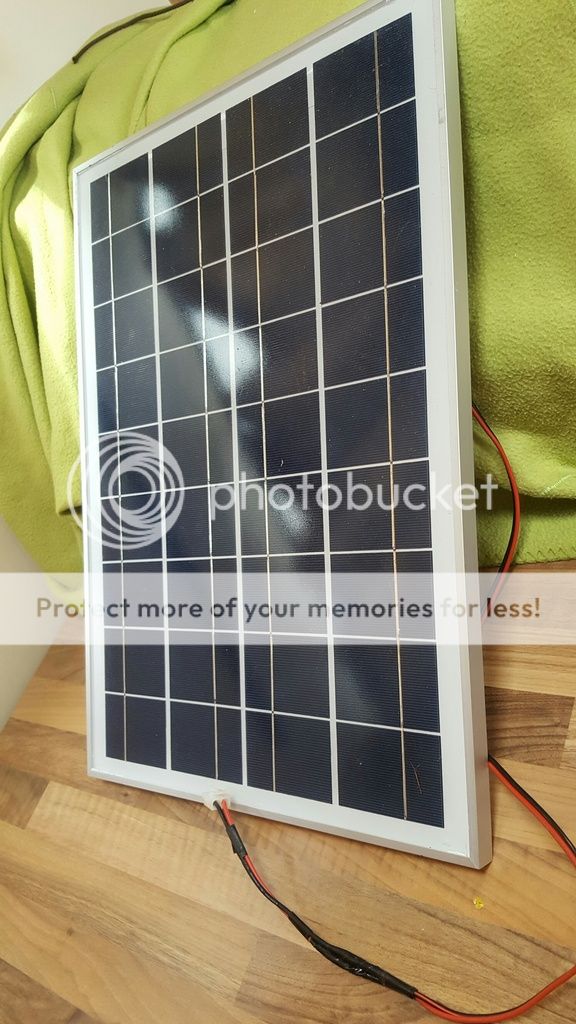
The solar panel needs to be pointing skywards but I didn't want to fit it externally on the roof of my van. The obvious location is in the skylight/sunroof in the lounge as it is the biggest in the van. I measured the size of the skylight and chose the biggest solar panel I could find that would fit in said skylight. It is rated at 25w max output so in reality probably produces half of this. It sits in the aperture on top of the blackout blind and flyscreen frames - see picture.
As the charge controller is designed for permanent installation and I wanted this set up to be for in storage only and therefore to be removable I bought some Tamiya-style model car battery plugs and sockets from E*** to connect solar panel - controller - leisure battery. I made sure the connectors are not able to be accidentally connected in the wrong manner by using the male/female ends to ensure it is impossible to connect solar panel to battery direct or battery to solar panel inputs. This removes the risk of accidental damage or worse!
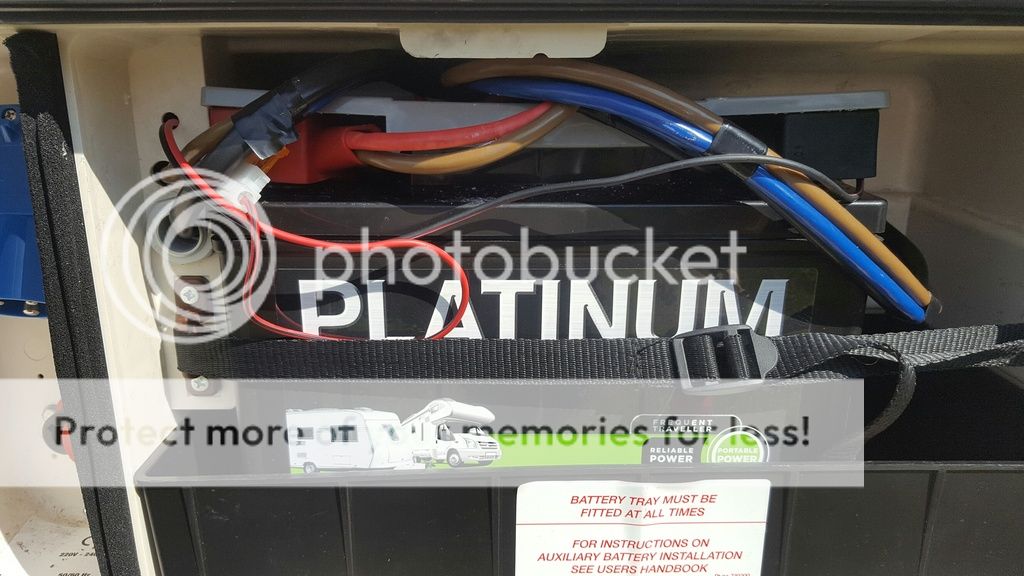
At the battery end I connected a cable with inline fuse as close to the terminals as possible. I drilled a hole in the battery box and fed the cable into the locker under the bed/dinette and fitted a Tamiya style connector. This stays permanently attached to the battery. see picture. Cables I fitted are the red and black ones. They are installed into the battery terminals screw thread connectors.
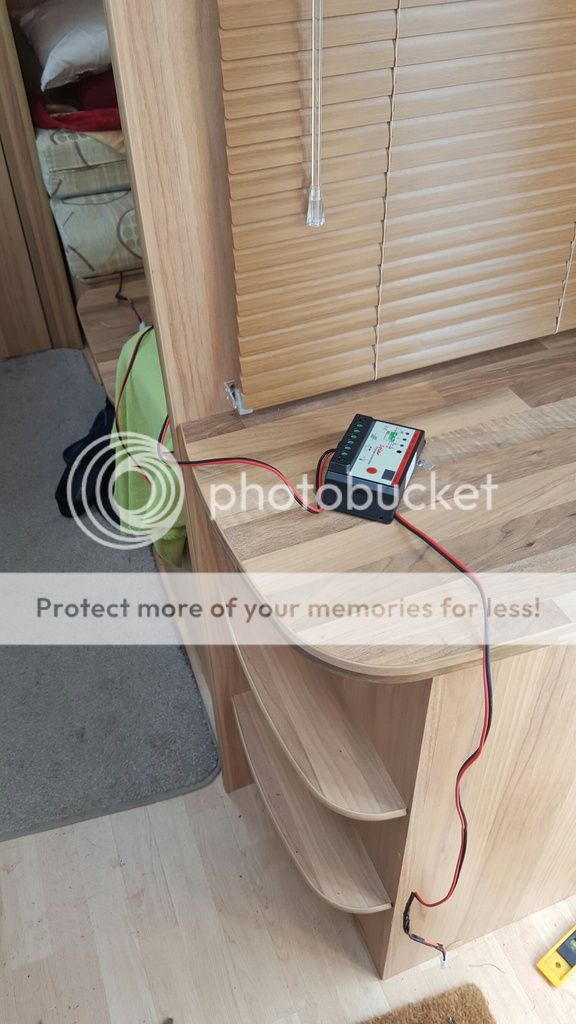
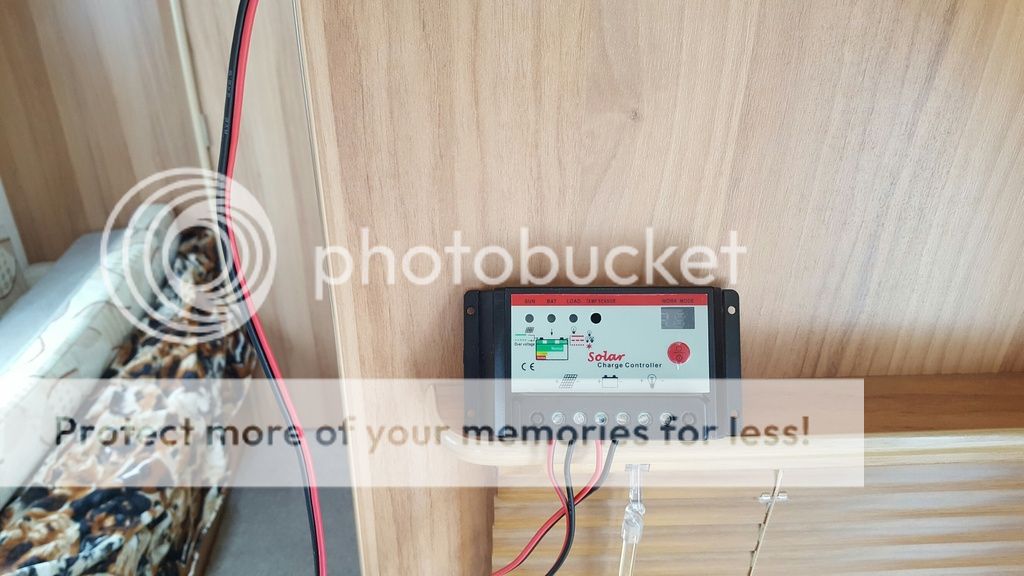
I then fitted permanent leads with Tamiya style connectors to the charge controller again being careful to make sure the connectors cannot be accidentally connected wrongly by clever use of male/female connectors. So now I have a solar panel that connects to the leisure battery via a charge controller that can be easily installed in storage to charge and maintain battery charge but can easily be removed and packed away for travelling and for actually camping!
Method of connection is battery to controller then controller to solar panel. Disconnection is the reverse of this. Never allow the solar panel and controller to be joined up without the battery being connected as equipment damage will almost certainly be the result!
Picture shows cable run into battery box and charge controller.
Close up of charge controller. It has many more features than I use but it will keep battery safe and sound from discharge and over charge.
Solar panel 25w before placement in skylight.
------------- Why am i doing this instead of camping??!!
I now use lights and radio in caravan when it is in storage when I need to do odd jobs or cleaning duties in confidence that the solar panel will recharge the battery whilst I am away. Easy retro fit upgrade for the average diy enthusiast that will cost about £50 to fit. And battery is fully charged ready for motor mover to shift it to a position fit to hitch it up to car. Buy one, fit it and enjoy free 12v charging of your leisure battery whilst in storage. And I do not sell this equipment, I just am amazed at how good it is!
------------- Why am i doing this instead of camping??!!
Be careful with power use as a 25w panel behind two layers of reflective plastic wont give much power to the battery, especially now were in the autumn equinox.
For those considering fitting larger panels is that the controller should be coupled to the battery before the solar panel, the controller then knows whether it should supply at 12v or 24v. Check the controller instructions to see if applies to your controller
Quote: Originally posted by Paul_B on 05/10/2016
Be careful with power use as a 25w panel behind two layers of reflective plastic wont give much power to the battery, especially now were in the autumn equinox.
I also share Paul's view that a 25 Watt rated panel set in a skylight has very little chance of confidently coping if it is hoped to do so through the winter.
Its ability will be devastated by the shadows and diffusion thrown by the very low sun angles we will get in winter. That is, even if the skylight does not get dirty, a blown leave or a bird present left on it.
My experience is that a near vertical south facing external panel of at least twice that size is needed and has the potential to be better "washed" by rain and snow slides.
It does depend on the parasitic drain on the battery, a new one here will be the solar controller itself. If there is a high drain like with an alarm a better solar system is needed, if the drain is very low, nothing could be better than an inadequate solar charger.
Our van is in storage in Spain and we use a 10w panel without a controller just to give a maintenance charge to the battery. The van is disconnected. The controller isn't needed for a low output panel with a large enough battery.
Reality check. Through your sky light, at best that panel can hope to provide is a couple of watts in direct sunlight.
Why wouldn't you want stick it to the roof permanently and run the wiring neatly? Makes the difference between a Heath Robinson mashup and a professional installation for the cost of a tube of sikaflex.
I have to agree with DaveCoaches. The idea is sound, but the long term practicalities, especially with shorter day light hours will, this setup will have very limited impact. Having previously installed a 120w panel onto the roof, I can assure you that external fitting is far more efficient.
The only concern I would point out too, is that the new cables shown going into the battery locker in the second photograph, should be fitted with a gas safe gland to prevent venting into the van itself. This may be picked up on your van service.
Call me crazy, but if the van is in storage and its secure, wouldn't the best & cheapest method for keeping the battery fully charged would be to take the battery away completely and just trickle charge it at home.
I use a small 10 watt solar panel in the front window (inside) via a voltage regulator. Yes there are two panes of acrylic in the way and it is only 10 watts max, but it should be remembered that you are only trickle charging anyway. I may pop over to the van every other week in the winter for the usual checks and maintenance, but then there are a full two weeks of trickle charging albeit with short days and lower light, but it does work and I get a fully recharged battery every time! By the way, face the panel near to or directly south and almost upright in the window to get the maximum from the low sun.
------------- The Sun always shines on TV.(and not on my caravan!)
Well, thanks for all your comments and opinions. This simple project has raised some interesting discussion and this is a great thing. If you want a fully fitted external solar array you need to drill holes in the roof for cables - not great for your water ingress warranty! That's why I fitted it internally. Yes its inefficient but 5w of battery charging to keep it fully charged is better than nothing and on sunny days I only guess to reach 10w - 15w of charge but that's plenty more than an all-in-one suitcase type charger can supply. My intention was to share this idea with other like minded diyers who want to spend around £50 on a solar solution to keeping a leisure battery topped up and not a full on off grid solar solution. My concept is simplicity but if you want to fit it permanent then go for it! You want concealed cables with fully fitted plug in points then fit it and post it up here for other members to see and be inspired by. If you feel its important to fit grommets to cables that will be carrying a maximum of 1.25A then fit them! I wanted an easily fitted and removable top up solar system for use in storage only and for that purpose it works brilliantly (so far!!). But why not make this topic more exciting by posting your solar project up with photos and descriptions so everyone can admire them!
------------- Why am i doing this instead of camping??!!
walk along the rows of any storage yard, and you will see solar panels being used up at the windows of the caravans, this has been going on for at least the last 10 yrs and in that case its nothing new that you have "invented"
I too have recently gone through the solar panel fitting process. I opted to have the panel(100w as this is what is being fitted to new vans) fitted on the roof by my local (approved) workshop. I was going to this myself, but decided that a professional fit would potentially be safer, given that the device is bonded, rather than bolted to the roof. I'm glad I did-the surface cleaner and adhesive kit is a specialist product and surprisingly expensive, and no, its not standard caravan sealant.
I fixed the panel to the brackets before mounting, and I used UK made nylon bolts into aluminium rivnuts fitted in the panel frame, as this allows easy removal of the panel if ever required. The bonus is this is all a no corrosion set up, which would occur if metal screws are used. I supplied this assembly to the workshop, so they only had to do the bonding which keeps the cost down.
Solar panels today have their own 4mm2 cabling which is a multi strand very fine wires to reduce voltage drop (i.e.its NOT automotive cabling). There are proper keyed connector now, to avoid polarity issues, which are significantly larger than Tamya type. With some ingenuity, it is not always necessary to puncture the roof for the cables. Mine run under the edge of a Heki skylight, through its frame, so the cables are hidden, then through the roof insulation (between the inner and outer skins) to the controller. Takes more time to achieve, but no leaks possible and all cables hidden.
Quote: Originally posted by doit on 13/10/2016
...If you feel its important to fit grommets to cables that will be carrying a maximum of 1.25A then fit them!
I assume that as mine was the only comment that mentioned glands, this response was for my benefit.
Irrespective of the current, if you read my comment I make mention of "gas safe glands" and the gland/grommet has nothing to do with current in this particular instance, but making sure the battery box remains sealed from the area of occupation to prevent gas venting into the van during charging of the battery.
Quote: Originally posted by doit on 13/10/2016
... But why not make this topic more exciting by posting your solar project up with photos and descriptions so everyone can admire them!
Already done that too, will share again if I find the post from some years ago, although fairly irrelevant as installed for a much heavier demand than your requirement. I fitted a 100w panel onto the roof, bonded and fully sealed cable entry point, running via an MTTP controller and remote display.
Amazing family weekend with old steam engines, classic car displays, market stalls, and full catering and bar. And camping on site - Save £25 by booking in advance.